Introduction
The Quick Access Toolbar (QAT) is a customizable toolbar that is located either in the upper-left corner next to the Application button (see Figure 1) or below the Ribbon (see Figure 2).
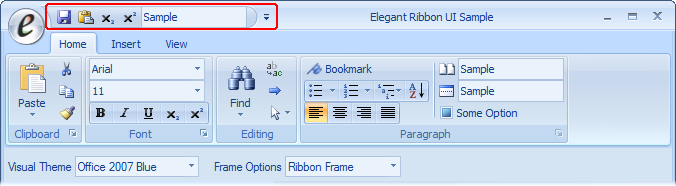
Figure 1 Quick Access Toolbar at the top
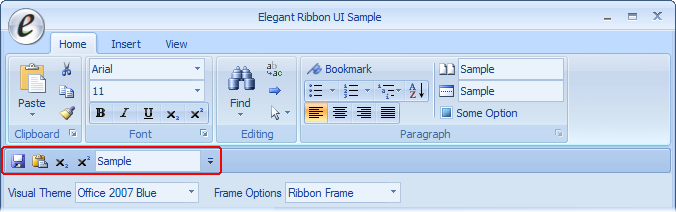
Figure 2 Quick Access Toolbar under the Ribbon
Elegant Ribbon provides full implementation of the Quick Access Toolbar functionality defined in the 2007 Microsoft Office System User Interface Design Guidelines. Besides Elegant Ribbon is designed to allow you to set up the Quick Access Toolbar with the minimum of effort so that you can do almost all the work using the Visual Studio designer.
QAT Implementation Overview
The Quick Access Toolbar in Elegant Ribbon is based on the concept of command-oriented interface, when user-interface controls are separated from the code that implements user actions (you can read more about this in Working with Commands). In fact, if a control is not linked to a command object, it cannot be added to the Quick Access Toolbar.
To explain how it works, let us look at what happens when the user adds a button (for example, Paste) to the Quick Access Toolbar. First, a new instance of the button control is created and all its properties are copied from the original Paste button. Then the new button is wired to synchronization events, and finally it is added to the Quick Access Toolbar. The question arises, how you should handle Click events for this button, which was in fact added dynamically? Indeed, if you used the traditional approach and created a Click handler for the Paste button, a click on its copy in the Quick Access Toolbar would not be handled because this copy has no handler.
Using command objects provides a simple and elegant way of solving this problem. You create a Paste command and, through its Command property, link it to the original Paste button. Now, when a copy of the button is created for the Quick Access Toolbar, the reference to the Paste command is copied along with all other properties. So when the user clicks Paste in the Quick Access Toolbar, the very same Paste command is executed.
So the main thing is that you should the Quick Access Toolbar in conjunction with commands. Otherwise, it is useless and you can simply hide it by setting the QuickAccessToolbarPlacementMode property of the Ribbon Bar to Hidden.
Working with the Quick Access Toolbar in Visual Studio Designer
At design time, the Quick Access Toolbar in Elegant Ribbon looks exactly as at run time. Besides, you can fully customize its properties using Windows Forms Designer. You can invoke the Ribbon Bar's context menu (see Figure 3) or its smart tags panel (see Figure 4) and open the Customize Quick Access Toolbar dialog for managing controls in the toolbar itself (see Figure 5) or frequently-added items in the Customize Quick Access Toolbar menu (see Figure 6).
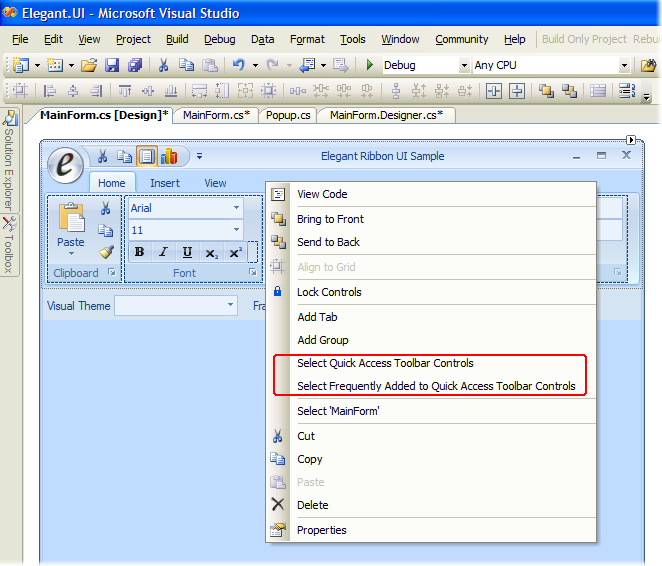
Figure 3 QAT-related items in the context menu for the Ribbon Bar
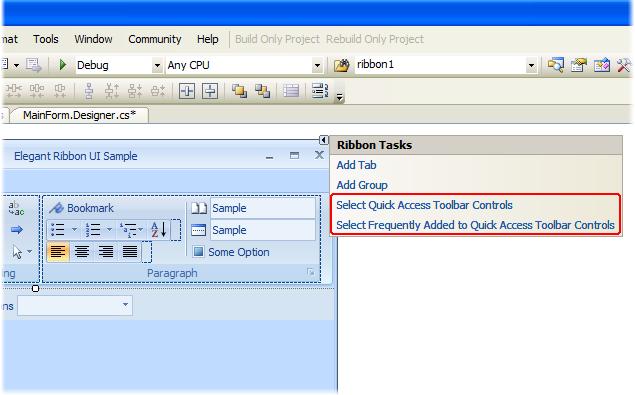
Figure 4 QAT-related items in the smart tags panel for the Ribbon Bar
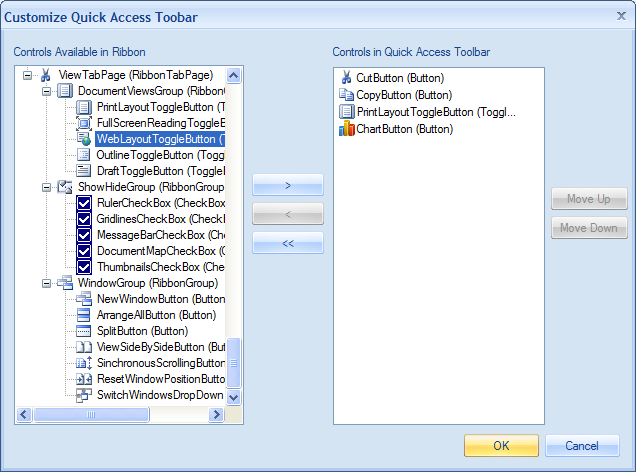
Figure 5 Customize Quick Access Toolbar dialog
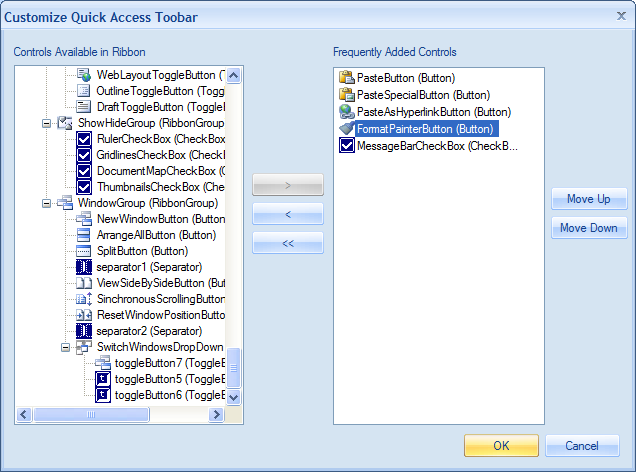
Figure 6 Customize Quick Access Toolbar dialog for frequently added controls
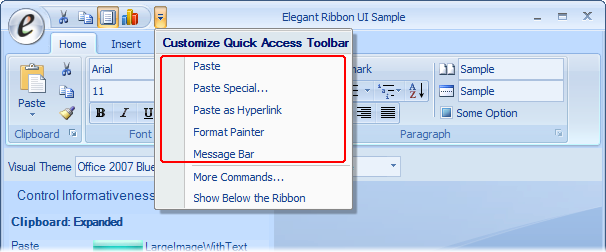
Figure 7 Frequently added controls in the Customize Quick Access Toolbar menu
The QuickAccessToolbarPlacementMode property of the Ribbon Bar (see Figure 8) allows you to place the Quick Access Toolbar above or below the ribbon or hide it at all.
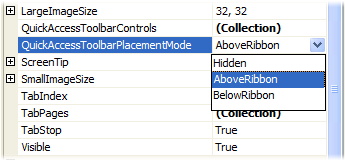
Figure 8 QuickAccessToolbarPlacementMode property
All the changes made to the Quick Access Toolbar at design time are serialized to the Windows Form Designer generated code.
Working with Quick Access Toolbar programmaticallyThe API for the Quick Access Toolbar is really simple. There are two collections (Ribbon. QuickAccessToolbarControls and Ribbon.FrequentlyAddedToQuickAccessToolbarControls and the Ribbon.QuickAccessToolbarPlacementMode property.
When you add a reference to a control to the Ribbon.QuickAccessToolbarControls collection, a copy of that control will be added to the Quick Access Toolbar. When you remove that reference from the collection, a copy of the control will be removed from the Quick Access Toolbar.
In the same way, you can work with the Ribbon.FrequentlyAddedToQuickAccessToolbarControls collection, which represents frequently added controls in the Customize Quick Access Toolbar menu (see Figure 7).
Please note that the control that you want to add to any of these collections must be assigned a command through the control's Command property (Read QAT Implementation Overview). Otherwise, an exception will be thrown. The user will not be able to add a control that has no command because the Add to Quick Access Toolbar item in the control's context menu will be always disabled.
The Ribbon.QuickAccessToolbarPlacementMode property allows you to control the position and visibility of the Quick Access Toolbar.
QAT State Serialization
In most cases, you may want the position of the Quick Access Toolbar and its content to remain persistent between application runs. This functionality is implemented as part of the general solution to serializing the user interface in Elegant Ribbon.
There is a PersistentStateManager static class that allows you to load and save the state of all Elegant Ribbon controls. Its Load(Stream stream) and Save(Stream stream) methods loads and saves the state to a stream. For example, you can use these methods to serialize the state to a file.
There are two more methods in the PersistentStateManager class, SaveToIsolatedStorageForDomain and LoadFromIsolatedStorageForDomain, that allows you to serialize the state to the operating system's isolated storage.
In most cases, if you have one ribbon control per application, it is enough to call the SaveToIsolatedStorageForDomain method in the Form.OnClosing overloaded method like as follows:
[C#]
protected override void OnClosing(CancelEventArgs e)
{
      PersistentStateManager.SaveToIsolatedStorageForDomain();
      base.OnClosing(e);
}

[VB.NET]
Protected Overrides Sub OnClosing(ByVal e As CancelEventArgs)
   PersistentStateManager.SaveToIsolatedStorageForDomain()
   MyBase.OnClosing(e)
End Sub
There is a PersistentStateManager.LoadStateAutomaticallyFromIsolatedStorageForDomain property that, if set to true (the default value), allows you to use SaveToIsolatedStorageForDomain without to having to call LoadFromIsolatedStorageForDomain explicitly: all the serialized data will be loaded automatically by the Elegant Ribbon framework.
In cases when you want to use more than one ribbon control in the application, e.g. in the main form and in a child form, it is not reasonable to use SaveToIsolatedStorageForDomain or Save(Stream stream) in the child form, because both methods save the state of all ribbon controls and there is no point in saving the state of the ribbon in the main form when only the child form closes and the user may want to continue work with the main ribbon. In cases like this, you can use the IObjectWithPersistentState.SavePersistentState method implemented in the ribbon control. This method saves the state to memory rather than to a stream or persistent storage so that you can then save the state of an object that is already disposed. In other words, when the child form is about to close, you call the SavePersistentState of the child ribbon in order to save its state in memory and when the application is about to close, you call SaveToIsolatedStorageForDomain to save the state of all ribbons including that that is already disposed.
Short Tutorial
- Create a new Windows Application project in Visual Studio.
- Place a ribbon on the form.
- Add a group to the ribbon and fill it with controls. Create and attach commands to these controls.
- Select the ribbon and click Select Quick Access Toolbar Controls in the ribbon's context menu. The Customize Quick Access Toolbar dialog should appear.
- Double-click an item in the tree view on the left in order to move it to the list on the right. Repeat the same for some other items. Click OK to close the Customize Quick Access Toolbar dialog and save he changes. Notice that at design time the Quick Access Toolbar is updated with the added controls.
- Build and run the application. You will see that the Quick Access Toolbar contains the controls you added at design time. Notice that controls on the ribbon and their copies on the Quick Access Toolbar look and behave the same.
- Close the application, go back to Visual Studio and override the OnClosing method of the main form. In this method, put the following line:
PersistentStateManager.SaveToIsolatedStorageForDomain()
- Run the application, customize the Quick Access Toolbar and change its location, close the application and run again. You will see that the Quick Access Toolbar has the same controls and the same location as you left it when you closed the application last time.
|