Getting Started with Prof-UIS
How to add the Prof-UIS Application Wizard to Visual Studio?
The Prof-UIS Application Wizard is similar to the MFC Application Wizard and generates a project that produces an executable application with certain functionality. If you installed the library using a Prof-UIS installer, run the Integration Wizard utility (IntegrationWizard.exe) located in the ..\FOSS Software Inc\Prof-UIS\Support\ folder, select the appropriate check box and click Next. If you do not use the installer, you can download the corresponding files from www.prof-uis.com and add the wizard manually: For Visual Studio 6.0, put ProfUisAppWizard. awx into the folder where other awx files for Visual Studio 6.0 reside, typically in C:\Program Files\Microsoft Visual Studio\Common\MSDev98\Bin\IDE\ For later versions of Visual Studio, unpack the corresponding files and folders into the following folders of Visual Studio: - ProfUISAppWizard into ..\Microsoft Visual Studio ***\VC\VCWizards\
- ProfUISAppWizard.ico, ProfUISAppWizard.vsdir and ProfUISAppWizard.vsz into ..\Microsoft Visual Studio ***\VC\vcprojects\
For example, if you are using Visual Studio 2005: - Unpack the ProfUISAppWizard folder into C:\Program Files\Microsoft Visual Studio 8\VC\VCWizards\
- ProfUISAppWizard.ico, ProfUISAppWizard.vsdir and ProfUISAppWizard.vsz files into C:\Program Files\Microsoft Visual Studio 8\VC\vcprojects\
After you add the Prof-UIS Application Wizard to Visual Studio, a ProfUISAppWizard item should be available in the New Project window. How to run a particular GUI theme available in Prof-UIS?
All user interface elements provided by Prof-UIS are painted with the global paint manager component, which is an instance of the CExtPaintManager (the Office 2000 theme) or any other class derived from it: CExtPaintManagerXP, the Office XP themeCExtPaintManagerOffice2003, the Office 2003 themeCExtPaintManagerStudio2005, the Visual Studio 2005 theme- your custom class
The Office XP theme is used by default. For example, you can activate the Visual Studio 2005 theme in your application with the code below:VERIFY(
g_PaintManager.InstallPaintManager(
new CExtPaintManagerStudio2005
)
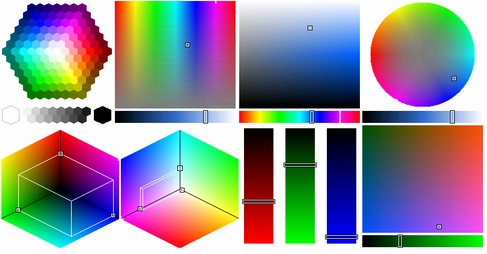
); How to display the advanced color selection dialog?
Just declare the CExtColorDlg object and call its DoModal() method. Use m_strCaption member
to set a custom caption for the dialog. To set initial colors, use
m_clrInit and m_clrNew members. The dialog provides several color picker modes, some of them are demonstrated below:
I am a novice in MFC programming. How to set up paths for Prof-UIS files in Visual Studio?
After completing the installation, you need to set up the required paths. This can be done either with the Prof-UIS Integration Wizard, or manually. The first way is simple and straightforward: Just select the check box Set Prof-UIS paths in Microsoft Visual Studio Environment Variables and click on the Next button. The second is described below.
Select Options from the Tools menu. Open Directories tab in Visual Studio 6 or open the Projects folder and, then, select Visual C++ in Visual Studio 7.0/7.1. In the Show directories for drop-down list, specify file types and corresponding paths according to the following table:
| File types |
Paths |
Visual Studio |
| Include files |
.../Prof-UIS/Include |
6.0, 7.0, 7.1 |
| .../Prof-UIS/Src |
| Source files |
.../Prof-UIS/Include |
| .../Prof-UIS/Src |
| Library files |
.../Prof-UIS/Bin_600 |
6.0 |
| .../Prof-UIS/Bin_700 |
7.0 |
| .../Prof-UIS/Bin_710 |
7.1 |
Add this line:
#include <Prof-UIS.h>
to your project's precompiled header file (usually StdAfx.h)
Now your program is linked together with an appropriate Prof-UIS library (depending on your project settings).
To allow your program run, you may need to copy the required Prof-UIS DLL (if any required) into the same folder with your program EXE file.
If you have any questions, please visit our forum or contact our technical support team at support@prof-uis.com.

|