Data Grid
How to merge a group of grid cells?
When working with a CExtGridWnd grid, you may want to find it necessary to merge cells. You can do this using the CExtGridWnd::GridCellJoinSet() method. Its nColNo and nRowNo parameters specify the top left cell in a range of merged cells and its CSize sizeJoin parameter defines the region size (see the figure below). 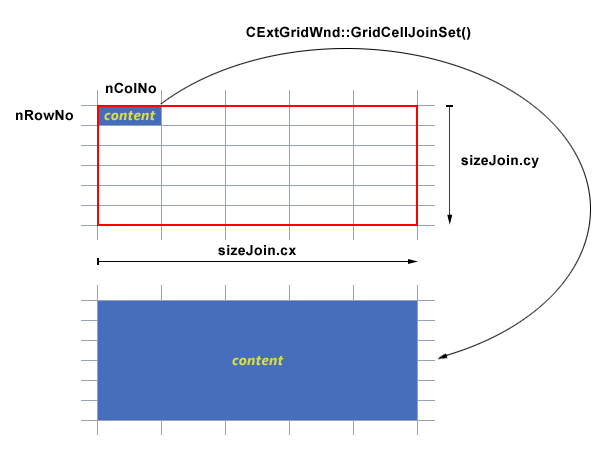
Please note that before using CExtGridWnd::GridCellJoinSet(), you should initialize all grid cells that will be merged. Any such a cell should be an object of a class that supports cell merging, e.g. CExtGridCellEx, which is a parent to most of grid cell classes. Although for better performance, some light weight classes in Prof-UIS do not support cell merging by default, e.g. CExtGridCellStringDM, you can always make such a class mergeable by applying a CExtGCJ template to it: CExtGCJ < CExtGridCellStringDM >. You can split merged cells back using the same CExtGridWnd::GridCellJoinSet() in which sizeJoin is set to CSize(1,1). In any case, the method returns a boolean value that indicates if the merge/split operation succeeded. NOTE: The cell merging requires Prof-UIS v2.83 or higher. How to make a newly added row correctly positioned in a sorted grid?
When a grid is sorted by one or more columns, a newly added row by default is displayed at the bottom of the grid. You should re-apply the sorting rules to the grid after some rows have been added or removed:
CExtGridWnd & wndGrid = . . .
CExtGridDataProvider & _DataProvider = wndGrid.OnGridQueryDataProvider();
_DataProvider.SortOrderUpdate( true, &wndGrid );
_DataProvider.SortOrderUpdate( false, &wndGrid );
I derived a class from CExtGridCell but it fails to be compiled, what may be wrong?
When implementing any custom class that is derived from CExtGridCell (or any other class derived from CExtGridCell), you should move the IMPLEMENT_SERIAL macros up before the definition of the debug version of the new operator. For example, if you created a class derived from CExtGridCellString, the IMPLEMENT_SERIAL macros should look like below: #include "StdAfx.h"
. . .
IMPLEMENT_SERIAL( CExtYourGridCell, CExtGridCellString, VERSIONABLE_SCHEMA|1 );
. . .
#ifdef _DEBUG
#define new DEBUG_NEW
#undef THIS_FILE
static char THIS_FILE[] = __FILE__;
#endif
. . . This allows you to avoid a conflict between the standard C++ operator new and a custom operator new with parameters defined in the CExtGridCell class. How I get notified when the user has selected(or cancelled) an item in a CExtGridCellCheckListComboBox?
The CExtGridCellCheckListComboBox has a virtual method named OnPopupListBoxItemClick() that is invoked each time the user changes the checked state (with the mouse or keyboard). So you can get notified about this by overriding this method in a CExtGridCellCheckListComboBox-derived class. Please note you should invoke the parent class’s method so the checked state can be changed properly.
How do I set a column's width in a grid?
CExtGridWnd supports one or more header rows both at top and at bottom. If you have at least one header row at top, you can set the width of any column by specifying the width of the corresponding cell in that header row:
OuterRowCountTopSet( 1L, false ); // Number of rows at top, the method of CExtGridWnd
CExtGridCellHeader * pCell =
   STATIC_DOWNCAST(
      CExtGridCellHeader,
      GridCellGetOuterAtTop(
         nColNo, // Column number
         0L, // Header row number, should be 0 here
         RUNTIME_CLASS(CExtGridCellHeader)
         )
      );
pCell->ExtentSet( 40, -1 ); // Minimum width
pCell->ExtentSet(50); // Current width (default value)
pCell->ExtentSet(100, 1); // Maximum width
How to catch the selection change event of CExtGridCellComboBox?
To catch the selection change event, create a CExtGridCellComboBox-derived class and override the CExtGridCell::OnPopupListBoxSelEndOK() virtual method, which should return a value from the parent method and perform your custom actions. The OnPopupListBoxSelEndOK() virtual method is called to handle the final selection change event of the list box control in the pop-up menu tracked by the built-in button. // *.h file:
virtual bool OnPopupListBoxSelEndOK(
CExtPopupInplaceListBox & wndListBox,
CExtGridCell::TrackCellStateInfo_t & _tcsi
);
// *.cpp file:
bool CYourCellCombo::OnPopupListBoxSelEndOK(
CExtPopupInplaceListBox & wndListBox,
CExtGridCell::TrackCellStateInfo_t & _tcsi
)
{
ASSERT_VALID( this );
ASSERT( (&_tcsi.m_cell) == this );
ASSERT_VALID( (&wndListBox) );
ASSERT_VALID( (&_tcsi.m_wndGrid) );
CExtGridCellComboBox::OnPopupListBoxSelEndOK(
wndListBox,
_tcsi
);
// place your code here
return false;
}How to create and manipulate a button in a grid cell?
There is no need to create a button control and attach it to the grid cell. Actually, you only need to modify the cell style so that you can see one or more buttons in the right part of the cell. The following built-in buttons are supported:
| Cell Style |
Button Type |
__EGCS_BUTTON_UPDOWN |
Up-down (also known as a spin box) |
__EGCS_BUTTON_DROPDOWN |
Drop-down |
__EGCS_BUTTON_ELLIPSIS |
Ellipsis |
There are two ways you can handle clicks on a cell button: at the grid window level and at the cell level. The first allows you to put the handler code in one place: use a CExtGridWnd-derived class, override its OnGridCellButtonPressed() method and return true if the click is handled. The method OnGridCellButtonPressed() takes 10 parameters, which provide all the information about the cell and the button: virtual bool OnGridCellButtonPressed(
CExtGridCell & _cell,
INT nButtonType,
const RECT & rcCellExtra,
const RECT & rcCell,
LONG nVisibleColNo,
LONG nVisibleRowNo,
LONG nColNo,
LONG nRowNo,
INT nColType,
INT nRowType
); The nButtonType parameter specifies the button type and, if it is a up-down button, allows you to determine which part was pressed:
| Button Type/Part
| Enumeration Constant
|
CExtGridCell::__EBTT_UPDOWN_UP |
Upper part of the up-down button |
CExtGridCell::__EBTT_UPDOWN_DOWN |
Lower part of the up-down button |
CExtGridCell::__EBTT_DROPDOWN |
Drop-down |
CExtGridCell::__EBTT_ELLIPSIS |
Ellipsis |
The second way of handling button clicks is overriding the OnButtonPressed() method in a CExtGridCell-derived class: virtual void OnButtonPressed(
CExtGridWnd & wndGrid,
INT nButtonType,
const RECT & rcCellExtra,
const RECT & rcCell,
LONG nVisibleColNo,
LONG nVisibleRowNo,
LONG nColNo,
LONG nRowNo,
INT nColType,
INT nRowType
);
For example, for a CExtGridCellString-derived class, the code may look like as follows: // DECLARATION
class CYourGridCellString : public CExtGridCellString
{
public:
. . .
virtual void OnButtonPressed(
              CExtGridWnd & wndGrid,
              INT nButtonType,
              const RECT & rcCellExtra,
              const RECT & rcCell,
              LONG nVisibleColNo,
              LONG nVisibleRowNo,
              LONG nColNo,
              LONG nRowNo,
              INT nColType,
              INT nRowType
              );
}; // class CYourGridCellString
// IMPLEMENTATION:
void CYourGridCellString::OnButtonPressed(
CExtGridWnd & wndGrid,
INT nButtonType,
const RECT & rcCellExtra,
const RECT & rcCell,
LONG nVisibleColNo,
LONG nVisibleRowNo,
LONG nColNo,
LONG nRowNo,
INT nColType,
INT nRowType
)
{
ASSERT_VALID( this );
ASSERT_VALID( (&wndGrid) );
CExtGridCellString::OnButtonPressed(
wndGrid,
nButtonType,
rcCellExtra,
rcCell,
nVisibleColNo,
nVisibleRowNo,
nColNo,
nRowNo,
nColType,
nRowType
);
if( nButtonType == __EBTT_ELLIPSIS )
{
AfxMessageBox( _T("CYourGridCellString::OnButtonPressed") );
}
}The second approach is more flexible because allows you to enable and disable a cell button by overriding the CExtGridCell::OnQueryButtonInfo() method: virtual bool OnQueryButtonInfo(
INT nButtonType,
bool * p_bEnabled,
bool * p_bPressed = NULL,
bool * p_bStayPressed = NULL,
UINT * p_nTimerElapseValue = NULL
) const;
A CExtGridCell-derived class can also be used for handling clicks on the up and down parts of the spin button and updating their state independently from each other. The following methods allows you to do this: virtual bool OnQueryEnabledIncrement() const;
virtual bool OnQueryEnabledDecrement() const;
virtual bool OnValueIncrement();
virtual bool OnValueDecrement(); How to show multiline text in a cell?
You can make a cell multiline by applying the __EGCS_EX_WRAP_TEXT extended style to it: pCell->ModifyStyleEx( __EGCS_EX_WRAP_TEXT ); The number of wrapped lines depends on the column width, row height and text length. Here is how to set some multiline text: pCell->TextSet(
_T("Line1\r\nLine2\r\nLine3\r\nLine4\r\nLine5")
); The in-place text editor associated with any editable text cell supports multiple text input so when you are typing in some text in it and want to insert a new line, use the Ctrl+Enter key combination, which is standard for multiline edit controls. How to correctly show a context menu in a CExtGridWnd grid?
This code demonstrates how to handle the WM_LBUTTONUP event and WM_CONTEXTMENU message. It changes the cell focus but not the selection. // Method Headers
virtual void OnShowContextMenu(
LONG nColNo,
LONG nRowNo,
CPoint ptTrack
);
virtual bool OnGbwAnalyzeCellMouseClickEvent(
UINT nChar, // VK_LBUTTON, VK_RBUTTON or VK_MBUTTON only
UINT nRepCnt, // 0 - button up,
// 1 - single click,
// 2 - double click,
// 3 - post single click & begin editing
UINT nFlags, // mouse event flags
CPoint point // mouse pointer in client coordinates
);
...
...
...
//{{AFX_MSG(CYourGridWnd)
afx_msg void OnContextMenu(CWnd* pWnd, CPoint point);
//}}AFX_MSG// Method Implementation
BEGIN_MESSAGE_MAP(CYourGridWnd,CExtGridWnd)
//{{AFX_MSG_MAP(CYourGridWnd)
ON_WM_CONTEXTMENU()
//}}AFX_MSG_MAP
END_MESSAGE_MAP()
...
...
...
void CYourGridWnd::OnShowContextMenu(
LONG nColNo,
LONG nRowNo,
CPoint ptTrack
)
{
nColNo;
nRowNo;
ptTrack;
// show your context menu here
}
bool CYourGridWnd::OnGbwAnalyzeCellMouseClickEvent(
UINT nChar,
UINT nRepCnt,
UINT nFlags,
CPoint point
)
{
ASSERT_VALID( this );
ASSERT( 0 <= nRepCnt && nRepCnt <= 3 );
if( CExtGridWnd::OnGbwAnalyzeCellMouseClickEvent(
nChar,
nRepCnt,
nFlags,
point
)
)
return true;
if( nChar == VK_RBUTTON
&& nRepCnt == 0 // 0 - button up
)
{
CExtGridHitTestInfo htInfo( point );
HitTest( htInfo, false, true );
if( (!htInfo.IsHoverEmpty()) && htInfo.IsValidRect()
&& htInfo.m_nRowNo >= 0
&& (htInfo.m_dwAreaFlags&__EGBWA_INNER_CELLS) != 0
)
{
CPoint ptFocus( htInfo.m_nColNo, htInfo.m_nRowNo );
SetFocus();
FocusSet( ptFocus, true, true, false );
CPoint ptTrack( point );
ClientToScreen( &ptTrack );
OnShowContextMenu(
htInfo.m_nColNo,
htInfo.m_nRowNo,
ptTrack
);
}
return true;
}
return false;
}
void CYourGridWnd::OnContextMenu( CWnd * pWnd, CPoint point )
{
LONG nRowNo = SelectionGetLastRowInColumn( 0L );
if( nRowNo < 0 )
nRowNo = FocusGet().y;
if( nRowNo >= 0 )
{
CRect rcCell;
if( GridCellRectsGet(
0L,
nRowNo,
0,
0,
&rcCell
)
)
{
CPoint ptTrack( rcCell.left, rcCell.bottom );
ClientToScreen( &ptTrack );
OnShowContextMenu(
0L,
nRowNo,
ptTrack
);
}
}
}How to make scroll bars in my grid window consistent with the current theme?
By default, the horizontal and vertical scroll bars of the CExtGridWnd class are painted as regular Windows scroll bars. You can make them consistent with the currently used paint manager by following these simple steps:
1) Override GetScrollBarCtrl() method in a CExtExtGridWnd-derived class: virtual CScrollBar * GetScrollBarCtrl( int nBar ) const
{
ASSERT_VALID( this );
if( m_hWnd == NULL || (! ::IsWindow(m_hWnd) ) )
return NULL;
ASSERT( nBar == SB_HORZ || nBar == SB_VERT );
if( nBar == SB_HORZ )
{
if( m_wndScrollBarH.GetSafeHwnd() != NULL )
return ( const_cast < CExtScrollBar * > ( &m_wndScrollBarH ) );
}
else
{
if( m_wndScrollBarV.GetSafeHwnd() != NULL )
return ( const_cast < CExtScrollBar * > ( &m_wndScrollBarV ) );
}
return NULL;
}2) Declare two CExtScrollBar properties: CExtScrollBar m_wndScrollBarH, m_wndScrollBarV; 3) Initialize the CExtScrollBar windows in the PreSubclassWindow() virtual method if your grid window is used as a custom dialog control or in the WM_CREATE message handler of the grid otherwise: m_wndScrollBarH.m_eSO = CExtScrollBar::__ESO_BOTTOM;
m_wndScrollBarV.m_eSO = CExtScrollBar::__ESO_RIGHT;
if( ! m_wndScrollBarV.Create(
WS_CHILD|WS_VISIBLE|SBS_VERT|SBS_RIGHTALIGN,
CRect(0,0,0,0),
this,
1
)
)
{
ASSERT( FALSE );
return;
}
if( ! m_wndScrollBarH.Create(
WS_CHILD|WS_VISIBLE|SBS_HORZ|SBS_BOTTOMALIGN,
CRect(0,0,0,0),
this,
2
)
)
{
ASSERT( FALSE );
return;
}
m_wndScrollBarH.SyncReservedSpace( &m_wndScrollBarV );
m_wndScrollBarV.SyncReservedSpace( &m_wndScrollBarH );
OnSwRecalcLayout( true );How to implement drag-and-drop for inner cells in my grid?
You can implement drag-and-drop for any grid derived from CExtGridWnd. Here are some key points to keep in mind: - To enable drag-and-drop functionality, override the
CExtGridWnd::OnGbwDataDndIsAllowed() virtual method: it should simply return true; - You can suppress drag-and-drop for a particular cell(s) by overriding
CExtGridWnd::OnGbwDataDndCanStart(): it should return false when appropriate; - Implement your drag-and-drop algorithm itself in the
CExtGridWnd::OnGbwDataDndDo()virtual method; - Implement the standard
IDropSource and IDropTarget interfaces so that you can catch drag-and-drop events in your application. You should implement IDropTarget whenever you want: your grid, other window, or even some other application.
You can see the implementation details in the FormEditor sample, where the user can drag-and-drop items from the toolbox onto a form. How to make a particular cell read only?
You can make any cell in any grid window read only by applying the __EGCS_READ_ONLY style to the cell object: pSomeCell->ModifyStyle( __EGCS_READ_ONLY ); Please note that applying this style does not disable activation of the cell editor (i.e. clicking such a cell activates the corresponding in-place editor window that is also read-only). This may be useful for copying cell's text into the clipboard. You can suppress in-place activation for a cell by applying the __EGCS_NO_INPLACE_CONTROL style: pSomeCell->ModifyStyle(__EGCS_NO_INPLACE_CONTROL ); How to set a range for the CExtGridCellUpDown cell?
You can set a range for a cell of the CExtGridCellUpDown type by overriding the OnQueryEnabledIncrement() and OnQueryEnabledDecrement() virtual methods of this class. Here is a sample code that sets the range of 0 to 255: bool CExtGridCellUpDownColorPart::OnQueryEnabledIncrement() const
{
ASSERT_VALID( this );
if( intVal >= 255 )
return false;
return true;
}
bool CExtGridCellUpDownColorPart::OnQueryEnabledDecrement() const
{
ASSERT_VALID( this );
if( intVal <= 0 )
return false;
return true;
}How to change the background color of a grid row?
To set the color of a row, just set the color for each cell in this row. Starting from Prof-UIS 2.42, the CExtGridCell class contains BackColorSet() and BackColorGet() methods that allow you to specify background colors for any grid cell when it is in the normal, hovered and selected states.
How to sort columns/rows in the grid programmatically?
The data sorting is performed by the CExtGridWnd::GridSortOrderSetup virtual method, which either sets new sorting rules or modifies the current rules. For example, the following code snippet sets ascending order for the first column: CExtGridDataSortOrder gdsoColumns;
CExtGridDataSortOrder::ITEM_INFO _soii(
0, // sort first column
true // true - ascending sort order, false - descending
);
gdsoColumns.m_arrItems.Add( _soii );
m_wndGrid.GridSortOrderSetup(
false, // true - sort colums, false - sort rows
gdsoColumns,
false,
false, // invert sort order
true
);How to enable/disable resizing for a particular column in the data grid?
Each column in the data grid supports three widths: minimum, maximum, and current. If these column widths are equal, the column cannot be resized. Let's assume you need to disable resizing for column nColNo in a grid window with one header row at the top. The header cells, which are usually objects of the CExtGridCellHeader class, are used to keep column widths. So, you need to access the appropriate header cell and change the width values stored in it: INT nColumnWidth = . . .
LONG nColNo = . . .
// get the header cell at top for nColNo column
CExtGridCell * pCellHeader =
wndGrid.GridCellGetOuterAtTop( nColNo, 0 );
ASSERT_VALID( pCellHeader );
// change current width
pCellHeader->ExtentSet( nColumnWidth );
// change minimal width
pCellHeader->ExtentSet( nColumnWidth, -1 );
// change maximal width
pCellHeader->ExtentSet( nColumnWidth, 1 );To take immediate effect, just invoke: wndGrid.OnSwRecalcLayout();
wndGrid.OnSwDoRedraw(); How to get the selected row indexes from the grid window, or change selections programmatically?
The selection model in the grid control is based on the array of rectangles. Each rectangle describes indices of left/top and right/bottom cells of a single rectangular selection region. If your grid uses the single selection model, then the selection region consists of one rectangle only. The full-row and full-column selection models are also based on rectangles. The data grid also supports two types of multiple selection models: excluded and non-excluded. The cell is assumed to be non-selected if it is covered by an even number of rectangles in the excluded model. The cell is assumed to be selected if it is covered by at least one rectangle in the non-excluded model.
The excluded multiple selection model is turned on if the __EGBS_SUBTRACT_SEL_AREAS style is applied by invoking the SiwModifyStyle() method of the grid control. The SimpleGrids sample demonstrates both excluded and non-excluded models.
Please note that each rectangle can be non-normalized, i.e. it is possible that left > right and/or top > bottom.
You can enumerate all the selected cells in column nColNo by using: LONG nRowNo = wndGrid.SelectionGetFirstRowInColumn( nColNo );
while( nRowNo >= 0 )
{
. . .
nRowNo = wndGrid.SelectionGetNextRowInColumn( nColNo, nRowNo );
}You can use the SelectionGetLastRowInColumn() and SelectionGetpPrevRowInColumn() methods for traversing the same rows in the reversed order from bottom to top. You can also enumerate all the selected cells in row nRowNo by using:LONG nColNo = wndGrid.SelectionGetFirstColumnInRow( nRowNo );
while( nColNo >= 0 )
{
. . .
nColNo = wndGrid.SelectionGetNextColumnInRow( nColNo, nRowNo );
} You can use the SelectionGetLastColumnInRow() and SelectionGetPrevColumnInRow() methods for traversing the same columns in the reversed order from right to left.
The SelectionGetForCell( nColNo, nRowNo ) method allows you to detect whether a cell is selected regardless the selection model. You can invoke the SelectionGetHitCount( nColNo, nRowNo ) method to get the number of rectangles covering the specified cell. The SelectionGetAreaCount() method returns the total number of rectangles. The SelectionGet(), SelectionInsertAt(), SelectionSetAt(), SelectionRemoveAt(), SelectionIsEmpty() and SelectionUnset() methods are handy when you need to perform any operation with the array of rectangles which describe the current selection region. The two SelectionSet() overloaded methods allows you to append a new rectangle and optionally to remove previous rectangles. The FocusSet() method sets both focus and selection at once. You can override the OnGbwSelectionChanged() virtual method to track when selection changes. You can also override the OnGbwSelectionCanModify() virtual method and return false if the current selection region cannot be changed. You can do the same for the focus by overriding the OnGbwFocusChanged() and OnGbwFocusChanging() methods.
If you have any questions, please visit our forum or contact our technical support team at support@prof-uis.com.

|