Overview
Elegant Calendar is a feature-rich calendar control that allows you to select one or multiple days. The calendar features a single and multi-month layout.
The week numbers, non-month days and a month-selection popup provides fast navigation.
The calendar is highly customizable and enables you to easily change almost every aspect of its visual presentation. You can create one or more
visual styles and associated these styles with particular days. You can even completely redraw and change the size of the days
to give your calendar a unique look.
You can select the format of displaying the days of the week: first letter, abbreviated or full. The other customizable properties include
the first day of the week, today's date and Today and None buttons.
You can see the major elements of the calendar control in Figure 1.
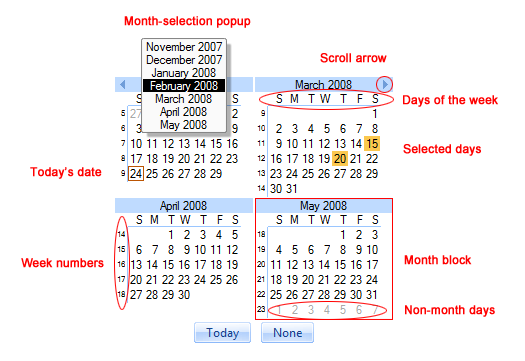
Figure 1 Calendar control and its elements
Configuring Basic Settings
To place a calendar control on a form, select it in the Toolbox and drag and drop it on the form where you want the calendar to be
located (see Figure 2). After it appears on the form, you can resize or dock it to get the desired size.
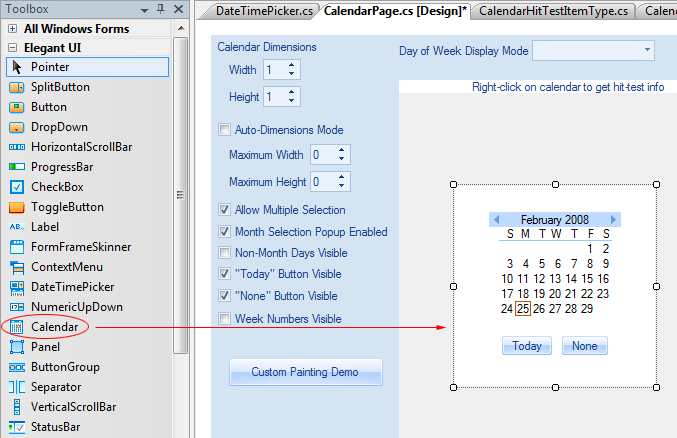
Figure 2 Calendar control placed on a form in the Windows Forms Designer
By default, the calendar displays one month at a time. You may want to have more than one month by displaying a certain number of months
in rows and columns. You can do this by using the Calendar.CalendarDimensions property. For example, the following code defines a
calendar with two rows and three columns (see Figure 3):
[C#]
calendar1.CalendarDimensions = new Size(3, 2);


[VB.NET]
calendar1.CalendarDimensions = New Size(3, 2)
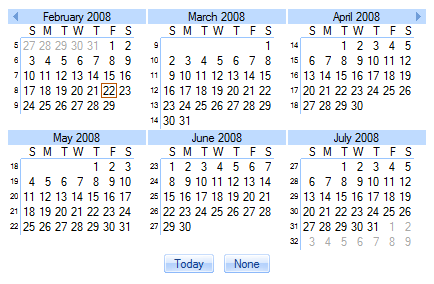
Figure 3 Calendar with two rows and three columns
If your calendar is resizable, it may be user-friendly to change the number rows and columns automatically depending on the calendar's size so that your
calendar always displays the maximum number of months that fit its bounds. You can do this using just one line of code:
[C#]
calendar1.AutoDimensionMode = true;

[VB.NET]
calendar1.AutoDimensionMode = True
If for some reason you need to restrict the number of rows and columns, set the calendar's MaximumAutoDimensions to a desired value.
For example, the following line limits the number of months to nine, which means when the calendar is expanded, the maximum number of rows and
three columns will be three:
[C#]
calendar1.MaximumAutoDimensions = new Size(3, 3);

[VB.NET]
calendar1.MaximumAutoDimensions = New Size(3, 3)
By default, when the application starts, the displayed month (for a multi-month layout, it is the month in the first row and the first column)
is determined by DateTime.Now (or by Calendar.CustomTodayDate if Calendar.UseCustomTodayDate is set to true). You can change
the month displayed first by using the Calendar.FirstVisibleMonth property.
The following table lists some other useful properties for customizing the calendar control.
| Property | Description |
|---|
| Calendar.WeekNumbersVisible | Shows/hides the week numbers. |
| Calendar.AllowMultipleSelection | Turns on/off multiple date selection |
| Calendar.TodayButtonVisible | Shows/hides the Today button |
| Calendar.NoneButtonVisible | Shows/hides the None button |
| Calendar.DayOfWeekDisplayMode | Specifies the format in which the days of the week are displayed: first letter,
abbreviared or full. |
Handling Date Selection Change
When the user changes selection in the calendar using the mouse, keyboard or by pressing the Today or None button, a
Calendar.SelectionChanged event is raised. You can handle this event to get the currently selected date(s) by using Calendar.SelectedDate
or Calendar.SelectedDates properties. In this handler you can implement some application specific logic.
For a single-selection calendar (Calendar.AllowMultipleSelection is set to true), your code may look like this:
[C#]
 void calendar1_SelectionChanged(object sender, EventArgs e)
 {
     DateTime date = calendar1.SelectedDate;
     //...
 }

[VB.NET]
Private Sub calendar1_SelectionChanged(ByVal sender As Object, ByVal e As EventArgs)
	 Dim [date] As DateTime = calendar1.SelectedDate
	 '...
 End Sub
For a single-selection calendar (Calendar.AllowMultipleSelection is set to true), your code may look like this:
[C#]
void calendar1_SelectionChanged(object sender, EventArgs e)
{
    DateTime[] selectedDates = calendar1.SelectedDates;
    //...
}

[VB.NET]
Private Sub calendar1_SelectionChanged(ByVal sender As Object, ByVal e As EventArgs)
	Dim selectedDates As DateTime() = calendar1.SelectedDates
	'...
End Sub
You can also obtain the collection of selection ranges by using the Calendar.SelectionRanges property. There is a corresponding
Calendar.SelectionRangesChanged event, which occurs when any selection change happens, even if it is not caused by the user.
Finally, you can use the Calendar.IsDateSelected() method to determine if a given date is selected in the calendar.
Day Styling
If you need to make one or more dates in a calendar visually distinctive from regular dates, you can use a set of day styles and associate
these styles with particular days. To change appearance of desired days, you need to perform the following:
- Create one or more instances of CalendarDayStyle and set their properties (Name, TextColor and TextFont) to desired values
- Add the date styles to the collection Calendar.DayStyles
- Handle the Calendar.ResolveDayStyle event to associate particular styles with particular days
Here is the sample code that makes every Sunday drawn in red:
[C#]
public Form1()
{
	InitializeComponent();

	calendar1.DayStyles.Add(new CalendarDayStyle("SundayStyle",
				Color.Red, calendar1.DayFont));
	calendar1.ResolveDayStyle += Calendar1_ResolveDayStyle;
}

private void Calendar1_ResolveDayStyle(object sender,
				ResolveCalendarDayStyleEventArgs e)
{
	if (e.Date.DayOfWeek == DayOfWeek.Sunday)
	e.DayStyleName = "SundayStyle";
}

[VB.NET]
Public Sub New()
	InitializeComponent()

	calendar1.DayStyles.Add(New CalendarDayStyle("SundayStyle", _
					Color.Red, calendar1.DayFont))
	AddHandler calendar1.ResolveDayStyle, AddressOf Calendar1_ResolveDayStyle
End Sub

Private Sub Calendar1_ResolveDayStyle(ByVal sender As Object, _
				ByVal e As ResolveCalendarDayStyleEventArgs)
	If e.Date.DayOfWeek = DayOfWeek.Sunday Then
	e.DayStyleName = "SundayStyle"
	End If
End Sub
You can see the result of the above code in Figure 4.
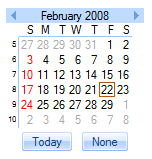
Figure 4 Calendar with Sundays colored in red
Custom Sizing and Drawing
You can give your calendar a unique look by performing your custom drawing and/or sizing of days. The custom drawing is turned on
when the Calendar.UseCustomDayDrawing property is set to true. The drawing itself should be implemented in a
Calendar.DrawDay event handler. Here is the code that illustrates custom drawing of days:
[C#]
private void SampleCalendar_DrawDay(object sender, CalendarDrawDayEventArgs e)
{
	DateTime date = e.Date;

	if (e.Selected)
		 using (Brush b = new SolidBrush(SampleCalendar.SelectedDayBackColor))
		 e.Graphics.FillRectangle(b, e.Bounds);

	Brush brush;
	if (e.NonMonthDay)
		 brush = new SolidBrush(SampleCalendar.NonMonthDayTextColor);
	else
		 brush = new SolidBrush(SampleCalendar.DayTextColor);

	using(StringFormat sf = new StringFormat())
	{
		sf.Alignment = StringAlignment.Far;
		 using (brush)
		e.Graphics.DrawString(date.Day.ToString(), SampleCalendar.DayFont,
			brush, new PointF(e.Bounds.Right, e.Bounds.Top), sf);
	}
}

[VB.NET]
Private Sub SampleCalendar_DrawDay(ByVal sender As Object, ByVal e As CalendarDrawDayEventArgs)
	Dim [date] As DateTime = e.Date

	If e.Selected Then
		 Dim b As Brush = New SolidBrush(SampleCalendar.SelectedDayBackColor)
		 Try
		 e.Graphics.FillRectangle(b, e.Bounds)

		 Finally
			 CType(b, IDisposable).Dispose()
		 End Try
	End If

	Dim brush As Brush
	If e.NonMonthDay Then
		 brush = New SolidBrush(SampleCalendar.NonMonthDayTextColor)
	Else
		 brush = New SolidBrush(SampleCalendar.DayTextColor)
	End If

	Dim sf As StringFormat = New StringFormat()
	Try
		sf.Alignment = StringAlignment.Far
		 Try
		e.Graphics.DrawString([date].Day.ToString(), SampleCalendar.DayFont, _
			brush, New PointF(e.Bounds.Right, e.Bounds.Top), sf)
		 Finally
			 CType(brush, IDisposable).Dispose()
		 End Try
	Finally
		CType(sf, IDisposable).Dispose()
	End Try
End Sub
You can also change the default size of day's bounding rectangle by setting Calendar.UseCustomDayRectangleSize to true and
Calendar.CustomDayRectangleSize to a desired value. If you need to invalidate particular dates in the calendar, you can do this by using
the Calendar.InvalidateDateRange() method.
Miscellaneous Features
Elegant Calendar provides some additional handy features that you may need.
By default, the control determines whether a date is today by comparing it with DateTime.Now. You can however override this
behavior and use a custom today's date, which can be specified using the Calendar.CustomTodayDate property. To let the calendar
know that it should use Calendar.CustomTodayDate instead of DateTime.Now, set the Calendar.UseCustomTodayDate
property to true.
The Calendar.SelectionMinimumDate and Calendar.SelectionMaximumDate properties allow you to restrict the maximum
and minimum dates that the user can select.
Elegant Calendar enables you to show or hide non-month days in the first and last month blocks. These days, by default displayed
in gray, belong to the previous or next month. When the user clicks a non-month day, the content of the calendar block is replaced
with the previous or next month. You can turn these features on or off by using the Calendar.NonMonthDaysVisible and
Calendar.SwitchMonthAfterNonMonthDayClick properties.
By default, the first day of the week is specified by the system local settings. You can override this by using the
Calendar.CustomFirstDayOfWeek and Calendar.UseCustomFirstDayOfWeek properties.
You can assign custom text to the Today and None buttons by using the Calendar.NoneButtonCustomText and
Calendar.TodayButtonCustomText properties.
|