Introduction
This is a short guide to using Elegant Ribbon, a set of controls that allows you to provide your Windows Forms application with the ribbon user interface similar to that introduced in Microsoft Office 2007.
Elegant Ribbon is developed with Visual Studio 2005 from the ground up and designed for this IDE. So the guide assumes you have Visual Studio 2005 installed on you computer.
Installing Elegant Ribbon
The installation is easy and simple to do:
- Close all instances of Visual Studio 2005.
- Run the installer ElegantRibbonSetup.exe.
- After the installation complete, open Visual Studio 2005, create or open a C#/VB.NET Windows Application project, and make sure that the Toolbox contains Elegant Ribbon controls (see Figure 1).
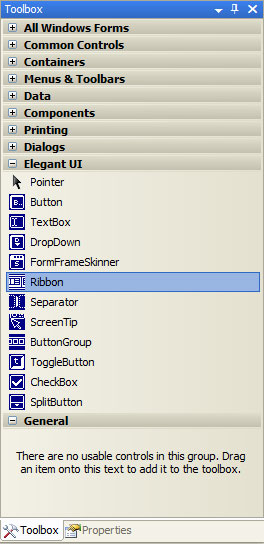
Figure 1 Elegant Ribbon controls in Toolbox
Adding and Arranging Controls
The concept of Ribbon UI provides a simple and logical way of grouping controls by their purpose. The ribbon at the top of the window contains several tabs, each tab contains one or more groups, and each group serves as a container for regular controls like buttons, check boxes, etc. One of the distinguished features of Elegant Ribbon that you can do a considerable part of your work using the Windows Forms Designer.
You can add a ribbon to a form by dragging the Ribbon item from the Toolbox. Once added to the form, the ribbon by default contains one tab page and an empty group in it (see Figure 2).
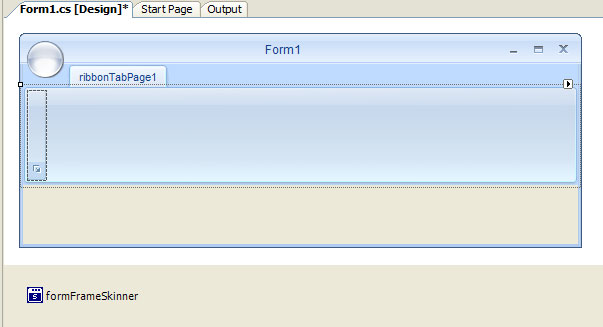
Figure 2 Ribbon added to a form
There is one more component that was added, FormFrameSkinner, which skins the non-client area of the form and makes it look like that in the Microsoft Office 2007 applications. If you prefer the standard Windows non-client area, simply delete the FormFrameSkinner from the from.
Using the context menus or smart tags panels of the added components, you can now add as many tab pages and groups as you want. After you have a group, you can fill it with regular controls, like Button or TextBox, by dragging them from the Toolbox to the group (see Figure 3):
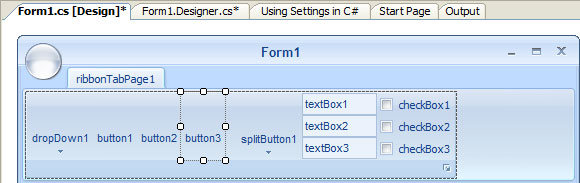
Figure 3 Group with added controls
There is another type of container that can be used inside groups, ButtonGroup. It allows you to group the following controls: Button, ToggleButton, DropDown, and SplitButton. You can add a ButtonGroup to a group in a tab page by dragging it from the Toolbox. Please note that controls inside the ButtonGroup are persistently small.
The last thing worth mention about adding controls is adding and filling pop-up menus. In Elegant Ribbon, there are three controls that support the pop-up menu, the built-in Application Button in the top-left corner of the ribbon, SplitButton and the DropDown. When you right-click any of them, they produce an Add New Popup Menu item that allows you to add a pop-up menu to the control (see Figure 4).

Figure 4 Create New Popup Menu creates a pop-up menu
After you added the pop-up menu to the Application Button or DropDown, you can fill it with items (see Figure 5):

Figure 5 Filling the pop-up menu with items
Finally when your controls are on the form, you can set their properties and adjust the position of any control within each group by dragging it to a new position.
Adjusting the Layout Behavior
Once you placed controls on the form, the adaptive layout is already enabled and, if you resize the form horizontally, you will see that the control layout changes without any additional action from you. You can however modify the layout behavior of controls by adjusting their properties. This is described in Adjusting Adaptive Layout.
Please note the layout behavior is the same both at design time and run time which should help you speed up application development.
Commands
If you have a Button and you want to handle clicks on it, you can just create an event handler and put your custom logic into it. But if your application is quite large, Elegant Ribbon allows you to benefit from the concept known as command-oriented interface, when user-interface controls are separated from the code that implements user actions. There is a global pool of command objects (Command) and there are controls on the form. You can now link a command with one or more controls using control's Command property. For example, when clicking a control that has an associated command, the command's Execute event is raised and you can handle this event in your command handler code. There is a number of benefits in using this approach and you can read more about this in Using Commands.
Disabling the Evaluation Pop-Up
When purchasing Elegant Ribbon, you get a license key. To disable the background window indicating that an evaluation copy of Elegant Ribbon is used, just specify the license key in your code [IMPORTANT] before the first use of the ribbon: // First way
[C#]
private static void Main()
{
Elegant.Ui.RibbonLicenser.LicenseKey =
"XXXX-XXXX-XXXX-XXXX-XXXX-XXXX-XXXX-XXXX-XXXX-XXXX-XXXX-XXXX";
Application.Run(new MainForm());
}
[VB.NET]
Private Shared Sub Main()
Elegant.Ui.RibbonLicenser.LicenseKey = _
"XXXX-XXXX-XXXX-XXXX-XXXX-XXXX-XXXX-XXXX-XXXX-XXXX-XXXX-XXXX"
Application.Run(New MainForm())
End Sub
// Second way
[C#]
public class MainForm
{
static MainForm()
{
Elegant.Ui.RibbonLicenser.LicenseKey =
"XXXX-XXXX-XXXX-XXXX-XXXX-XXXX-XXXX-XXXX-XXXX-XXXX-XXXX-XXXX";
}
}
[VB.NET]
Public Class MainForm
Shared Sub New()
Elegant.Ui.RibbonLicenser.LicenseKey = _
"XXXX-XXXX-XXXX-XXXX-XXXX-XXXX-XXXX-XXXX-XXXX-XXXX-XXXX-XXXX"
End Sub
End Class
Short Tutorial
Follow these simple steps to get started with Elegant Ribbon quickly.
- Open Visual Studio and create a new Windows Forms application.
- Open the main application form and make the Toolbox pane visible.
- Find the Elegant UI toolbox tab and drag a Ribbon onto the form using the mouse.
- Now you can see the ribbon control with an empty tab and a group. The FormFrameSkinner component at the bottom is added by default to provide a custom non-client area like in Office 2007
- Select the tab by left-clicking it and open the Properties pane. Change the Text property value to "Home".
- Select the group and change the Text property value to "My Group".
- Fill our the group with controls. Open the Toolbox and select the Button component. Drag as many buttons as you want onto the group.
- Set the Text property to some value of your choice for each button and see the results.
- You can decorate your buttons with images. Each control supports both large and small images. You can also set different images for different control states (normal, hovered, pressed, etc.). To set images for the button, find the SmallImages (or LargeImages) properties in the Properties pane and expand it. You will see a set of properties named by control state (the number of states can vary by control). Click the ellipsis button next to the Normal property and set a desired image using the standard dialog.
- Build and run your application. You can try resizing the form and see how the layout of the buttons and group is changing and collapsing depending on the form width. You can change the layout behavior by adjusting the properties of the controls (read Adjusting Adaptive Layout for details).
- Add more groups and tabs to your ribbon. Play with check boxes, toggle buttons, drop-downs, etc.
- You can handle user input from the controls. Select a button you want to handle clicks from, in the Properties pane, select the Events tab, and double click on the
Click event. You can put any custom logic into the generated event handler. Elegant Ribbon offers you a more advanced technique called command-oriented interface. To learn more, read Using Commands.
|