|
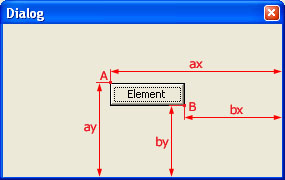
This article was initially published on February 10, 2003 and updated on February 06, 2006. You probably know that to implement a window with controls which can dynamically change their sizes when the parent window changes its size requires a lot of time and effort rather than knowledge of the Windows messaging system. An ill-considered mechanism causes developers either to replicate once written code or write new code again. The Prof-UIS library provides you with a complete, simple, and elegant solution, which is based on the use of anchors. The anchor is a point on a control, which is used to bind the control's position relative to the parent window's edges. For example, the control on (see Figure 1) has two anchors. If you anchor a control to (a) specific side(s) and then resize the parent window, the control's distance from the anchored side(s) will not change or change in certain proportions. 
Figure 1. Element with two anchors It is a CExtWA template class that gets anchoring working. In other words, you can anchor one or more controls on a window to which the CExtWA template is applied. For example, CExtResizableDialog has the following definition: class CExtResizableDialog : public CExtWA< CExtWS < CDialog > > That means you can use CExtResizableDialog without modifying it, but, if you want to anchor controls on, for example, CFormView, you will need to apply CExtWA to it yourself like as follows:class CMyFromView : public CExtWA < CFormView > To anchor a control, use the AddAnchor() method (it features four overloads). The first parameter specifies the anchored control by its identifier or hWnd. The second and third parameters, which are set in percents, indicate how the size and location of the control change when the window's size changes. To be more exact, the second and third parameters describe how the top left corner and bottom right corner of the control change their coordinates when the parent window is resized. For example, AddAnchor(ID_MYCONTROL, CPoint(0, 0), CPoint(100, 100)) means that the Element (see Figure 1) will change its position in the following way: - point A does not move at all (it keeps its positions relative to the dialog edges intact)
- point B moves both horizontally and vertically, with bx and by remaining the same.
You can also use the following predefined constants instead of specifying them with CPoint(): __RDA_NONE = { -1, -1} - No anchoring. The control size and its position remain unchangeable
__RDA_LT = { 0, 0} - Fixed control position
__RDA_RT = { 100, 0} - Anchoring to the X-axis 1:1
__RDA_LB = { 0, 100} - Anchoring to the Y-axis 1:1
__RDA_RB = { 100, 100} - Anchoring to both the X-axis and the Y-axis 1:1
__RDA_KEEP = __RDA_LT;
__RDA_X = __RDA_RT;
__RDA_Y = __RDA_LB;
__RDA_XY = __RDA_RB;
__RDA_BOTH = __RDA_RB;
Let us create a simple project that demonstrates how to anchor two list boxes on a resizable dialog (the CExtResizableDialog class). - Create an MDI-application using MFC Application Wizard (leave the default settings intact) and name it ResizableApp. The following steps are given for Visual Studio 7.1, though any other Visual Studio can be used with little change.
- Include the library header file in the project by adding the following line to StdAfx.h:
#include <Prof-UIS.h> Make sure that Prof-UIS paths for header and lib files are properly set in the Visual Studio settings (run the Options dialog, and select Projects | Visual C++ Directories). You can read about how to correctly set Prof-UIS paths in the article Getting Started with Prof-UIS. NOTE: To successfully compile ResizableApp, you need to compile the profuisdll project of Prof-UIS first so that ResizableApp can find both the lib and dll files (they should be available in the ..\Prof-UIS\Bin_710\ folder, e.g. ..\Prof-UIS\Bin_710\ProfUIS252md.lib and ..\Prof-UIS\Bin_710\ProfUIS252md.dll). - Open the ResizableApp Property Pages dialog by selecting Project | Properties and fill in the Working Directory field by specifying the path to Prof-UIS lib and dll files.
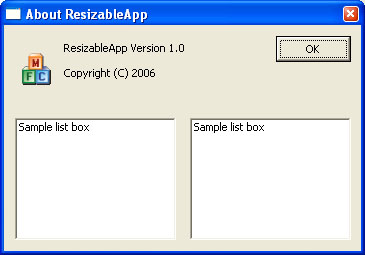
- Open the About dialog in resources, change its Border property to Resizing, the ClipChildren to True, and put two list boxes on it like it is depicted on Figure 2:

Figure 2. Resizable About dialog By default, the list boxes have identifiers IDC_LIST1 and IDC_LIST2. - Inherit the
CAboutDlg class from CExtResizableDialog by modifying the ResizableApp.cpp file:...
class CAboutDlg : public CExtResizableDialog
{
...
}
CAboutDlg::CAboutDlg() : CExtResizableDialog(CAboutDlg::IDD)
{
}
... - Add the
OnInitDialog() override to the CAboutDialog class (e.g. using the Overrides property grid available from the Properties control bar) and anchor the OK button and both list boxes in this way:BOOL CAboutDlg::OnInitDialog()
{
CExtResizableDialog::OnInitDialog();
// TODO: Add extra initialization here
AddAnchor(IDOK, CPoint(100,0), CPoint(100,0));
AddAnchor(IDC_LIST1, CPoint(0,0), CPoint(50,100));
AddAnchor(IDC_LIST2, CPoint(50,0), CPoint(100,100));
return TRUE; // return TRUE unless you set the focus to a control
// EXCEPTION: OCX Property Pages should return FALSE
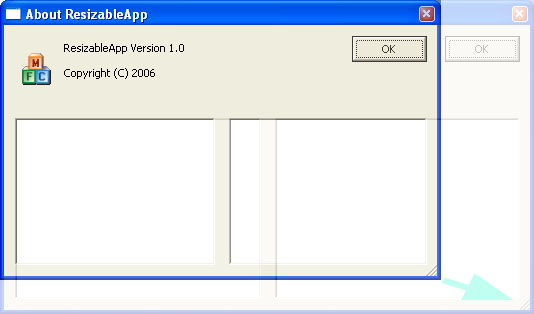
} - Compile the project and run the application. Open the About dialog and resize it with its gripper (which is in the bottom right corner). You will see (Figure 3) that both list boxes and OK change their size and position according to the rules you set with the
AddAnchor() method (i.e., each listbox changes its size directly in proportion to the dialog and the OK button remains stick to the right side):

Figure 3. Resizing the About Dialog with anchored controls - If you, for some reason, need to remove one or more controls, you can do this with
RemoveAnchor() or RemoveAllAnchors() methods.
|